http://www1.mscdirect.com/CGI/NNSRIT?PMPXNO=1658978&PMT4NO=101137081
All posts by Todd
How do I span disks in Ubuntu
DiscSpan 0.2.2
author: James S. Martin ceedvd ( a t ) g m a i l .com
maintainer: Richard M. Shaw hobbes1069 ( a t ) g m a i l .com
———
This tool is geared more towards smaller files such as music and photos
as it cannot span a single file across multiple discs.
If you have lots of files in the gigabyte range, this utility won’t be as efficient.
The tool is written in Python and uses growisofs as the burning interface.
Requirements
————
It is known to work in Fedora 12, 13, RHEL 5.5, but should work on any recent
Linux system with growisofs, and python 2.5-2.6. Requires the dbus-python module.
running and installing DiscSpan
—————-
copy the discscan.py somewhere in your path. Put discpan.ini in /etc,
/usr/local/etc, the same dir as discspan.py, or specify with –config=
Please edit discspan.ini to reflect the speed of your media/device,
as well as the capacity of your media. I have seen cases where
media sizes are slightly varied
run discspan.py.
Usage: discspan.py [options]
Options:
-h, –help show this help message and exit
–config=CONFIG_FILE Location of config file.
–start-disc=START_DISC
Specify disc to start with (in case of failed previous
burn)
–skip-big Skip files that are too big.
–test Performs a test run of the burn.
–dir=BACKUP_DIR Directory to backup.
–volume-name=VOLUME_NAME
Name for the volume.
–size-factor=SIZE_FACTOR
Specify size factor for disc capacity, i.e. 1 = 100%
–iso-dir=ISO_DIR Redirect iso generation to a directory. Filename will
be generated from volume name.
-v, –verbose Extended verbosity
If you don’t supply a backup dir, you will be prompted.
limitations
———–
The discspan.ini measurements are defined in gibibyte and mebibyte.
1G is defined as 2^30 bytes.
Lots of media manufactures define their stuff in gigabytes, which is
93% less than a gibibyte.
That’s why the nubmers you see in discspan.ini may look different
than what’s labeled on your media. Feel free to tweak to your
hearts content.
Read here:
http://en.wikipedia.org/wiki/DVD-R
http://en.wikipedia.org/wiki/Gigabyte
discspan will not follow symlinks (yet) !
DBUS doesn’t detect the capacity of the disc properly so I can’t modify
these on the fly. If someone can give me the capacity in bytes of a Dual Layer
DVD or Blue Ray/HD-DVD, I can add that.
I’ve guestimated values but if they are wrong, please tweek them and send
me an appropriate update.
Also, this has only been tested on dvd-r and dvd-rw media.
Thank Yous
———–
Thanks go out to Doc, Richard, Dez, Erin, Jason, Adam for their debugging, code contributions, and ideas!
Thank you to Davyd Madeley and Dieter Verfaillie for their DBUS
code examples! Without that, I would not have figured out
how to detect the DVD drive :).
Also thanks to the #python channel on freenode. Wonderful folks.
Robot Lawn Mower
Steve Goode and I are building up a hardware-minimal robotic lawn mower. Sort of an attempt to recapture the Lawn-Mower-On-A-String of yor, with no string.
This is a dumping ground for development information, not a tutorial. Use at your own risk.
1. Current Videos
2. Current Issues
3. Initial Setup
4. configuration files
5. NO RC Arm
6. Mower original information
7. PIXHAWK user manual
8. Log files to user group
9. Ardusimple RTK, Pointperfect
1. Current Videos
Mower misses bout 1 of every 3 passes
“Hardware Minimal” because it uses a 21inch push mower, stock front wheel drive, single steerable tailwheel.

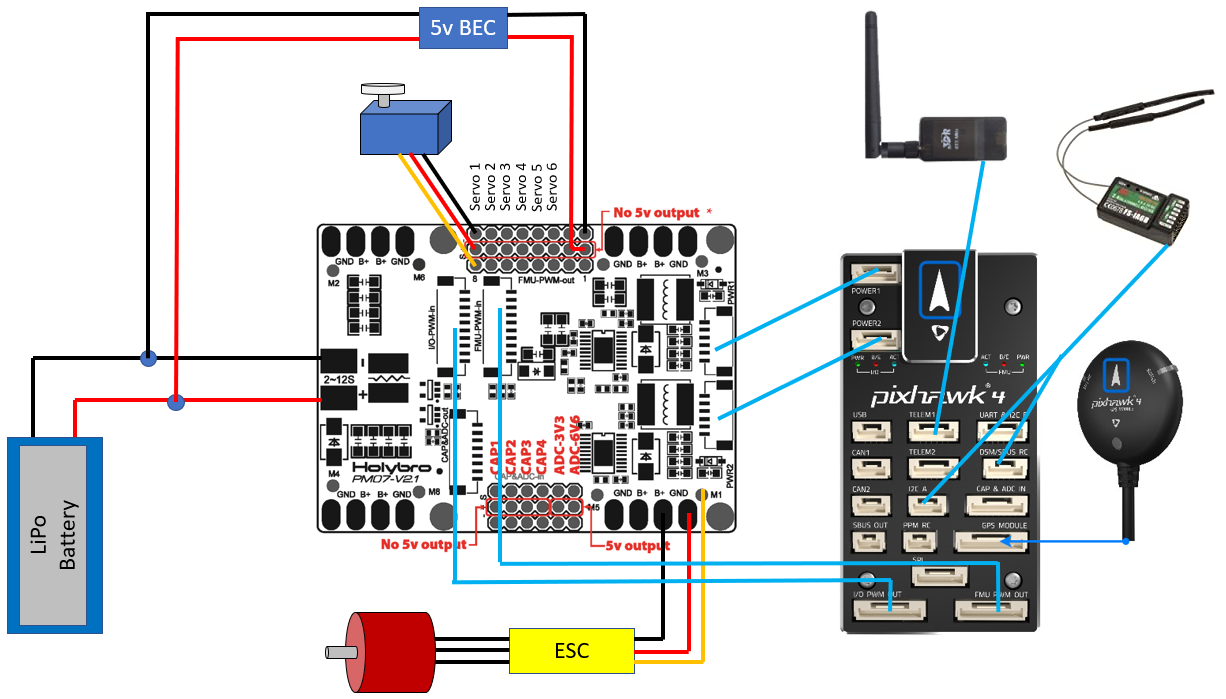
We are using Pixhawk 4 as the autopilot:

2. Current Issues
No Data Link–No data link. We use USB currently to connect MISSION PLANNER to PIXHAWK running ARDUROVER. This gives us configuration, start/stop, mode, and telemetery.here are the Old Notes-ESP8266 config for Mission Planner. I never could master this, so we bought a preconfigures 8266 from mRobotics. Perfect.
2. Cannot arm the no Rc. – solved, mostly – see note 2 at bottom
3. robot always drives away from desired course – solved, reversed servo channel 1
4. robot shows armed, but always circles left – solved, servo arm broken.
5. robot weaves back and fort across desired track – FF tuning, – solved, L1NAV tuning.
6.
No data link. We use USB currently to connect MISSION PLANNER to PIXHAWK running ARDUROVER. This gives us configuration, start/stop, mode, and telemetery.
here are the Old Notes-ESP8266 config for Mission Planner. I never could master this, so we bought a preconfigures 8255 from mRobotics. Perfect.
7. mower cannot “panic stop” – add relay to ignition shutoff
8. mower does not turn aggressively toward the desired track, slight swerve. – CURRENT TROUBLESHOOTING:
A. here is the check for max turn rate On Mission Planner’s Flight Data screen, check the “Tuning” checkbox (bottom middle), double click on the graph and select “gz” (Gyro Z-axis)
Drive the vehicle in Manual mode at a medium speed making very sharp turns
Set ACRO_TURN_RATE to a bit lower than the highest values seen. Note the value shown may be in centi-degrees/sec so its value should be divided by 100 to match the parameter’s deg/sec
b. https://ardupilot.org/rover/docs/rover-tuning-steering-rate.html
c. this puts the GCS TUNING permeters to PID on tuning screen
Set the GCS_PID_MASK to 1 (Steering)
d. on TUNING, select PID DESIRED, PID ACHIEVED.
E.
another summary of tuning in nav https://github.com/ArduPilot/ardupilot/issues/6565
Tuning turn rate
https://ardupilot.org/rover/docs/rover-tuning-steering-rate.html
__________________________________________________________
5 part intro to pixhawk_APM setup
PM07 INITIAL SETUP
ana volt and curr
Holybro pixh 4 pm
Cube or pixhawk
Volt devider calc 18.182
Curr
Amps per volt 36.364
Note 2 – Arm with no rc –
This Arm with no RC turned out to be such a pain that we installed a RC reciver and used that for manual steering. Much easier
RC receiver in use FS-X6B
20160924022953FS-X6B Receiver User Manual
Old parmeter list
Params1OLD
another old peram file
Params1OLD
Grass Sensor PC board:
Pin 1. Sensor 1 LED signal from ESP
Pin 2. DATA
Pin 3 DATA
Pin 4 POWER
Pin 5. GND
Pin 6.
Pin 7.
Pin 8. Reserved sensor 2.
Pin 9. SENSOR1 Signal to arduino, GND = no grass.
Wiskers PCB

MS Plug sample mumbers
Ms3126e12-10s
Ms3114e12-10p
Ms3126e14-s
Ms3114e14p
Spring 2022, spiral path via LUA script
Try native spiral in MP
In 1.3.74
(after you’ve got a polygon) – AutoWaypoints – Survey(grid) – Check “Advanced Options” in the display menu – Grid Options tab – Spiral.
Edit: Here’s a screen shot to make sure we’re talking about the same thing.
========================
Mower steering loads will blow up a servo if the wheel resists the servo command:


Alternative servo for the future:
Wingzine Servo boards
https://deepsouthrobotics.com/2019/08/23/anatomy-of-a-huge-self-driving-mower/
Notes on tuning configuration:
Acro turn rate, to the right 16s per 360, 22.5 deg/s
Navl1_damp. .85 try .75 again
Navl1_period. 15
Navl1_xtrack_i. .03
Steer P. 1. Try 0
Steer I. .4. Try 0
Steer p. 0
Imax. 1
FF. 2.2. .6 was way too low
Turn radius. .2
Config, 45 to 25.
Ff from .7 to 2.0. Improved turns. 2.5 is a little nervous. 2.2 best
Tires slip, belt slips
More on throttle tune
https://ardupilot.org/plane/docs/reverse-thrust-setup.html
https://www.instructables.com/Retreading-Your-Lawn-Mower-Tires/
6. Original mower information
The drive transmission conked out halfway through development. Quick to overhaul.

8. Log files to user group
TLDR: Noobe needs assistance tuning parameters on robot mower. Logs attached
All.
Thanks in advance for the help. We are building up a “hardware minimal” robot lawn mower. 21 inch self propel with a single steerable tail wheel. Stock front drive wheels, with rear wheels removed. Tailwheel steering via a less than perfect linkage to a heavy hobby servo. The platform has exceeded my expectations, but I am stumped on the final tuning. I would like smoother straight line steering.
Electronics are Pixhawk4, MP, stock PIXHAWK hockey puck GPS. HDG 1 and 2 set turned off, because it looks terrible on screen. Wild 45 degree HDG changes, even though the hockey puck is on a 30 inch mast.
It tracks a while with small, 6 inch deviations. Then occasionally takes a 20 degree steering lurch for a 30 inch deviation.
Biggest improvements have centered the PID DESIRED vs PID ACHIEVED tuning, leading to increasing FF toward 2.9. PID numbers adjustment seem to be useless
9. Ardusimple RTK, Pointperfect
RTK Improvement: https://mowerproject.com/category/rtk-gps/
tl;dr try Obviously we appear to be looking at a mask of 13-15 degrees elevation. 40 S/N
Thingstream domain
FairviewRover:
Password : FairviewRover#1
https://portal.thingstream.io/app/location-services
try this for a log in string FairviewRover:FairviewRover#1@pp.services.u-blox.com:8883
Arduino budget hookup
Pc setup
ARDUSIMPLE connection
We will go into UART AND 12C B port. That requires a Hirose DF13 connector 6 pin plug to a 6 pin JHST on the ardusimple end. ArduSimple produces a 6 inch cable
spring 2023
the 8266 was moved from STA to CLIENT.
Hard ip set to 192.168.1.100
subnet 255.255.255.0
here is the screen capture of the setup:

by this tutorial:
===============================================
Changing the Wifi SSID and Password
- connect from your PC to the wifi access point (initial access point ID is “ArduPilot”, and password is “ardupilot”)
- open a browser to 192.168.4.1 and a simple web interface will appear like below
- click on the “Setup” link
- set the “AP SSID” and “AP Password” fields (both must between 8 and 16 characters), push the “Save” button and reboot the device
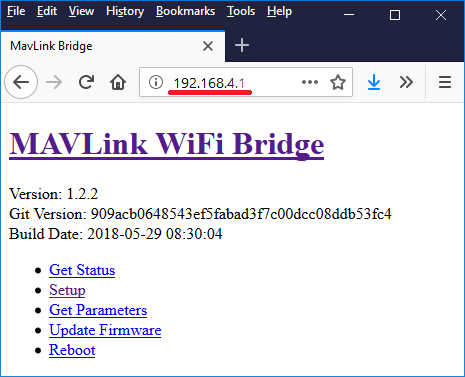
Thanks to Ray’s blog which was the source for some of this page’s advice
++++++++++++++++++++++End tutorial+++++++++++++++++
Here is the details to set up:
Thingstream>StarlinkRouter>HeffLink wifi>>>>>ESP8266>TelemPort1>UDP,57600>Pixhawk4>Ardupilot>NTRIP> ____user:pass@host:port/mountpoint______>Telem2 Port>ArduSimple F9P
NTrip string is now: FairviewRover:FairviewRover#1@pp.services.u-blox.com:8883/51705a15-somedigits-0eb011b4e410
This is the connection to Thingstream
We need to turn off the original GPS module.
F9P FW VER 1.13
On a pixhawk 2.4.8 connected to telemetry port 2, the parameter SERIAL2_PROTOCOL must be set to “2”
Did you try the FTDI drivers?
https://www.ftdichip.com/Drivers/VCP.htm
serial port with power
Hi power64,
Let’s see if we can help you implement what you have in mind. Some clarification:
– The Pixhaek JST-GH connector is following the Pixhawk standard:
* 1: 5V_IN (So you can find it 100% sure, pin 1 is the one connected to C9 on the PCB).
* 2: ZED-F9P UART1 RX (3.3V level)
* 3: ZED-F9P UART1 TX (3.3V level)
* 4,5: Not connected
* 6: GND
– As mentioned above it’s connected to UART1 of ZED-F9P. So you can use it at the same time as the XBEE.
– 5V Input, this connector doesn’t have 5V Output.
– 3.3V RX/TX. RX/TX are not 5V tolerant.
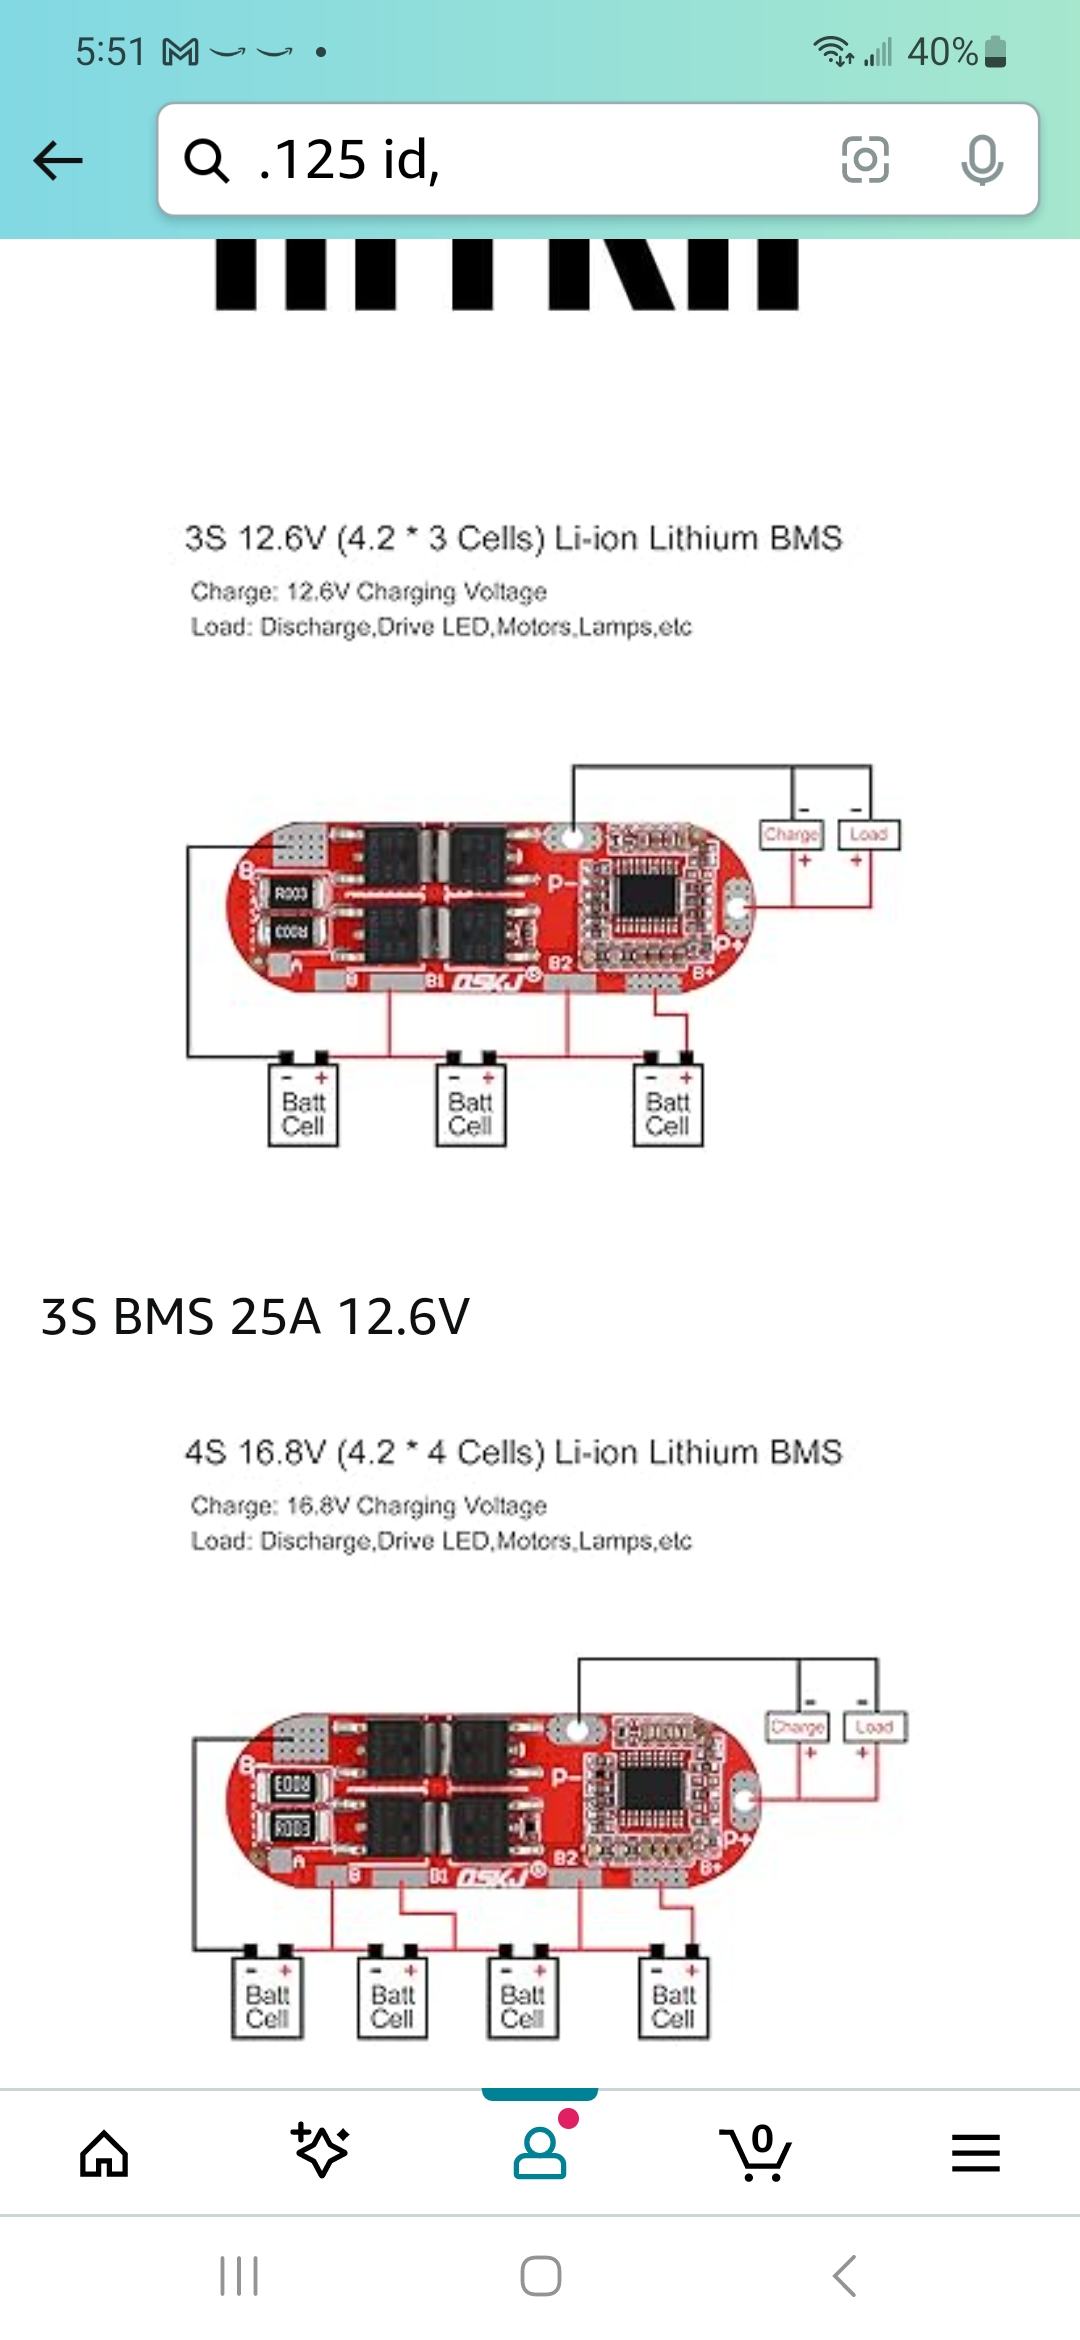
Lipo BMS
How do I Parse GPS data with PYTHON
How do I estimate the size of a Desuperheater?
Here is some Sizing DataDesuperheater
What would happen if you flew a Falcon 900 with the #2 Cowl latches loose?
This aircraft took off with the # 2 cowl latches loose.
Flew to destination airport. All was fine until the TR opened, then….$1.3 million in damage.
Here is a shot of the airplane SECONDS before the indecent, caught by happenstance by a Airliners.net phototog.
Here is the cowl on the ground
Here is what is left of the cowl on the engine
Keep your head about you boys…. the penalty for inattention is high.
todd
And Again. The penalties are high


How does the Falcon 900 Start Logic work?
All.
Attached is a very simplified run through of the start logic required to engage the #1 start contactor.
Starting at the left, “A” BUSS must be powered….Then moving right, RED GEN SW must be on………. and so on all the way to the 7K1.
I think I feel a Video Tutorial coming on….
How do I load the nav database in EPIC CDSR
Here is the quick guide:
Guidance From Mark Zuille
Pull AFCS breaker
Red disk First
Connect to port one in Engineers Panel
Reset Breaker 1
Monitor Local Area Connection on windows tray.
1 minute to stabilise
Load disk into laptop
Cancel out AUTORUN
AFGS “LOADER”
Install
Next, do the same procedure in blue disk.
Here is the Honeywell SDIM reference for data bas load:
What ever you do DONT DO THIS:
EPIC_CDSR_JSUM data base selction this defeats certain worldwide dta set to allow you to load ChinaChats for Example…..disaster.
How Much Horse power do various corperate jet use on the Hydraulic Pad?
Phenom Standby pump.
Capable of CONSUMING 3.6 HP worth of electricity
COMPONENT MAINTENANCE MANUAL
PART NO. 3032683–000
Rated Speed 7500 rpm
Rated Flow 1.1 gpm (4163.95 L/m) at 7500 rpm
Motor Current (Max) at 18 — 32 v.DC 98 Amps
Motor Voltage 28 vDC
Rated 18 to 32 vDC
Operating
CAUTION:
DO NOT RUN THE UNIT BELOW 400 PSI OUTLET PRESSURE TO
PREVENT SERIOUS DAMAGE OR PUMP FAILURE.
2400 r 25 psig outlet pressure
NOTE: Outlet flow shall be 1.10 gpm minimum and motor current shall not
exceed 95 amps.
________________________________________________
The math hurts my head
http://answers.yahoo.com/question/index?qid=20070805172104AAp7hik
http://www.engineeringtoolbox.com/horsepower-d_472.html


Why would I ground an airplane in the hangar?
Falcon Help desk:
Verbal recommended to ground the aircraft. No written recommendation or requirement.
Protection of personnel Aircraft to Ground STATIC Spark potential.
Protection of the personnel from aircraft to ground high voltage AC MAINS potential.
Protection ESD sensitive items Aircraft to Ground STATIC Spark potential.
Reduction of Galvanic corrosion
Insurance preference.
__________________________________________________________
Related Links:
Ground Rods for New Construction – Web Site – Local Excerpt
Excerpt from US armed forces Tech Manual
Call these people about grounding:
Lind Equipment Ontario
Phone: (905) 475-5086 begin_of_the_skype_highlighting (905) 475-5086 end_of_the_skype_highlighting begin_of_the_skype_highlighting (905) 475-5086 end_of_the_skype_highlighting
http://www.lindequipment.net/main2.cfm?id=0FC093EB-1372-5A65-3B40903E20FB2A03#Aviation%20Grounding
________________Bob,
very interesting.
I have worked on Mooneys and such, degaussing them with large coils, but the accepted resons was the original welding at the factory caused the magnetism.
Another one for my list
todd
On Fri, Dec 17, 2010 at 11:54 PM, Bob Hamel
todd
DAN said
4130 at the front of c185 and j3 will take magnetic SET just sitting
so in his words GROUNDING
” easier to do than demagnetizing airframe in 185 or Cub with fishbowl magnetic compass”
On Friday, December 17, 2010, at 10:25 PM, Todd Heffley wrote:
Bob
I received a fragment of your response on my private email.
+++++++++++++++++++++++++++++++++++++++++++++
85 owners here at Lyncrest cjl5
one chap uses ground in hanger (a/p 747 driver bush-pilot)
I asked him years ago about it
in his words
” easier to do than demagnetizing airframe in 185 or Cub with fishbowl magnetic compass”
+++++++++++++++++++++++++++++++++++++++++++++++++
Grounding :
Near pilot office, marked 10, 2.8 k to soil, 1.2 ohms to metal pipe
Near restrooms marked 12, 3.7k ohms to soil, 1.2 ohms to metal pipe